Unlocking the Beauty of Nature: A Guide to Cleaning Pine Cones for Crafters
In a world where creativity knows no bounds, artisans and crafters often find themselves yearning for unique materials that add a touch of enchantment to their masterpieces. Among the countless treasures nature has to offer, the humble pine cone stands tall as a versatile and captivating natural element that can be found in forests, parks, or even your own backyard. However, wading through the debris and dust that tends to cling to these remarkable botanical wonders can be a daunting task. Fear not, dear crafters! In this all-encompassing guide, we shall embark on a magical journey, learning how to cleanse and rejuvenate our beloved pine cones, turning them into exquisite treasures that will ignite our imagination and leave us spellbound. So grab your feather dusters and prepare your crafting cauldrons, for we are about to unravel the secrets of the pine cone cleaning ritual!
Table of Contents
- 1. Gathering Pristine Pine Cones: Tips and Best Practices
- 2. Preparing Pine Cones for Crafting: Removing Debris and Insects
- 3. The Soaking Solution: Revitalizing Pine Cones for Crafts
- 4. Drying Pine Cones: Nature’s Artistry Preserved
- 5. Enhancing Aesthetic Appeal: Painting and Decorating Pine Cones
- 6. Longevity and Preservation: Sealing and Storing Your Crafted Pine Cones
- 7. Creative Crafting Ideas: Making the Most of Cleaned Pine Cones
- Q&A
- Future Outlook

1. Gathering Pristine Pine Cones: Tips and Best Practices
When it comes to collecting enchantingly beautiful pine cones, a few tips and best practices will ensure that your collection is nothing short of spectacular. Follow these expert suggestions and elevate your pine cone gathering skills to a whole new level:
- Timing is everything: Pristine pine cones are typically found during the fall season when they have just fallen from the trees. Aim to collect them shortly after they drop for the freshest and most vibrant cones.
- Explore pine-filled areas: Seek out forests, parks, and nature trails that are teeming with pine trees. These environments offer a greater chance of finding an abundance of pine cones.
- Look for the perfect cones: Scan the ground carefully, keeping an eye out for pine cones that are intact, symmetrical, and free from any damage or deformities. These flawless specimens add a touch of elegance to your collection.
- Inspect for insects and critters: Before adding a pine cone to your stash, give it a quick examination for any hidden residents. Ensure your collection is pest-free to avoid any unwelcome surprises.
Remember, gathering pristine pine cones is not only a fantastic way to connect with nature but also a unique opportunity to embrace the beauty that surrounds us. With these tips in mind, embark on your pine cone hunting adventures and watch your collection grow with each carefully chosen cone.

2. Preparing Pine Cones for Crafting: Removing Debris and Insects
Preparing Pine Cones for Crafting:
Removing Debris and Insects
When it comes to crafting with pine cones, ensuring they are properly prepared is essential for a successful project. Before you begin, it’s important to make sure the pine cones are free from debris and insects. Not only does this help to create a clean and polished finished product, but it also prevents any unwanted surprises once your crafts are completed. So let’s dive into the steps to prepare your pine cones!
Step 1: Gathering the Supplies
- A pair of thick gloves
- A large paper or plastic bag
- An old toothbrush (preferably with stiff bristles)
Step 2: Removing Debris
Start by gently tapping the pine cones on a hard surface to dislodge any loose debris like dirt, bark, or leaves. Then, use the toothbrush to brush away the remaining debris. Be sure to brush in the direction of the scales to avoid damaging them. Remember to do this step outdoors or inside the bag to prevent a mess.
Step 3: Checking for Insects
Carefully inspect each pine cone for insects or eggs. If you notice any, place the pine cone in a sealed bag and freeze it for a few hours. This will effectively kill any pests without damaging the pine cone. Finally, remove the pine cone from the freezer and allow it to come back to room temperature before continuing with your crafting project.

3. The Soaking Solution: Revitalizing Pine Cones for Crafts
The secret to breathing new life into your pine cones for crafts lies in a simple yet magical soaking solution. By following these steps, you’ll unleash their hidden potential and ensure they become the standout element in your next creative project.
Firstly, gather a batch of pine cones and gently inspect them for any debris or insects, ensuring you only work with the finest specimens. Next, fill a large container with warm water and add a cup of gentle dish soap, creating a soothing bath for your pine cones. Allow the cones to soak for at least 30 minutes, giving them time to unwind and release any trapped dirt or grime.
- Patience is key: To achieve optimal results, don’t rush the soaking process. Let nature’s remedy work its magic, leaving your pine cones looking refreshed and rejuvenated.
- Gentle handling: When removing the cones from the solution, handle them delicately to prevent any damage. Treat them like rare gems!
- Drying time: After their relaxing soak, place the pine cones on a clean towel or tray to air dry. This will ensure they regain their natural texture and prevent any moisture-related mishaps in your crafting endeavors.
Now that your pine cones have been thoroughly pampered and invigorated, you’re ready to embark on your creative journey. Whether you’re using them for holiday decorations, wreaths, or even a unique centerpiece, their newfound beauty will undoubtedly captivate anyone who lays eyes upon them.

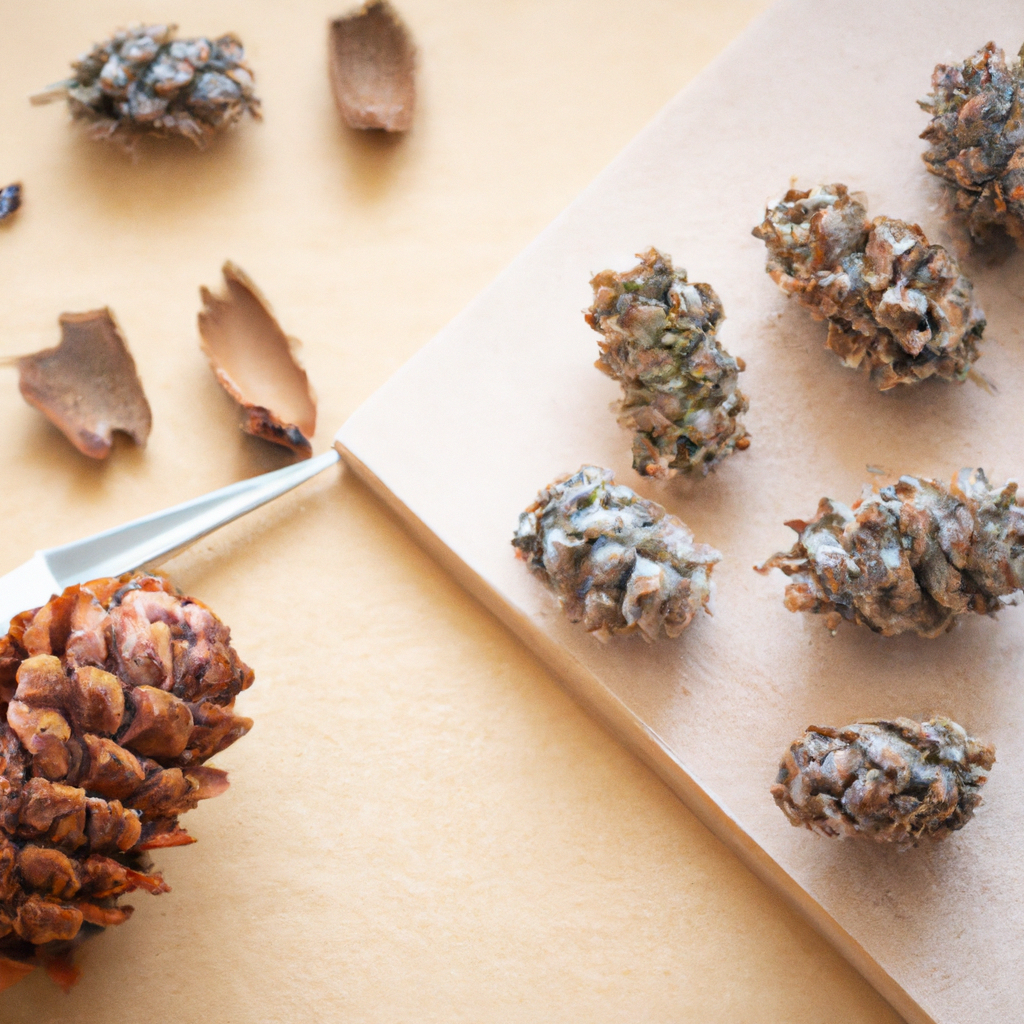
4. Drying Pine Cones: Nature’s Artistry Preserved
Step into the enchanting world of dried pine cones, where nature’s craftsmanship is perfectly preserved. Each pine cone tells a story of its own, capturing the beauty of the great outdoors and bringing a touch of rustic elegance to any setting. Drying pine cones not only enhances their aesthetic appeal but also ensures their longevity, allowing you to enjoy their intricate designs for years to come.
So, how do you go about drying these remarkable botanical treasures? Follow these simple yet magical steps:
- Collect fresh pine cones from the forest, a cozy reminder of nature’s breathtaking beauty.
- Inspect the pine cones to ensure they are free from dirt, debris, and any critters that may have sought refuge within.
- Preheat your oven to a gentle temperature, around 200°F (93°C).
- Spread the pine cones on a baking sheet, giving each one sufficient space to breathe.
- Place the baking sheet in the oven and let them dry for approximately two hours, releasing their earthy fragrance and softening their scales.
Once your pine cones have basked in the warmth of the oven and become fully dried, prepare to be captivated by their whimsical allure. Display them in an exquisite glass bowl, showcase them as charming table centerpieces, or incorporate them into captivating crafts.

5. Enhancing Aesthetic Appeal: Painting and Decorating Pine Cones
Painting and decorating pine cones is a delightful way to enhance their aesthetic appeal and bring a touch of nature’s beauty into your home. Whether you want to add a pop of color to your holiday decorations or create unique crafts for any season, these versatile and abundant treasures from the forest make the perfect canvas.
Let your creativity run wild as you explore all the possibilities for transforming pine cones into eye-catching works of art. With a wide range of paints and decorative materials available, the sky’s the limit! Here are a few ideas to get you started:
- Use acrylic paints to create vibrant and bold designs on the pine cones. Think geometric patterns, floral motifs, or even whimsical characters. The choices are endless!
- Experiment with metallic spray paints for a touch of elegance. Imagine how stunning your pine cones will look with a shimmering gold finish, adding a touch of glamour to your tabletop centerpiece or holiday wreath.
- Add a sprinkle of glitter to bring some sparkle and magic to your pine cones. Apply a thin layer of glue, then dust them with your favorite colored glitter for a dazzling effect.
- For a more natural and rustic look, consider using earthy tones or simply leave the pine cones in their natural state. This can create a lovely contrast when displayed alongside other painted cones.
Remember, there are no rules when it comes to decorating pine cones. So let your imagination take flight and have fun expressing your artistic flair. Whether you’re a novice or an experienced crafter, this simple and rewarding activity is sure to bring joy and beauty to your home.

6. Longevity and Preservation: Sealing and Storing Your Crafted Pine Cones
When it comes to ensuring the longevity and preservation of your beautifully crafted pine cones, proper sealing and storing techniques are crucial. By taking the necessary steps, you can proudly showcase your creations for years to come. Here are some tips to help you seal and store your pine cones:
- Choosing the Right Sealant: Before sealing your pine cones, it’s essential to select the most suitable sealant. Consider using a clear spray sealant that is specifically designed for crafts. This will provide a protective layer without altering the natural beauty of the pine cones.
- Sealing the Pine Cones: Once you’ve chosen the sealant, ensure you are in a well-ventilated area. Lay out the pine cones on a protected surface and apply an even coat of sealant, covering all sides. Allow them to dry thoroughly before moving on to the next step.
- Choosing the Right Storage Container: When it comes to storing your sealed pine cones, it’s important to pick an appropriate container. Opt for an airtight container made of either plastic or glass. This will protect your pine cones from dust, moisture, and potential damage.
…

7. Creative Crafting Ideas: Making the Most of Cleaned Pine Cones
Pine cones, the humble wonders of nature, can be transformed into exquisite crafts that will bring a touch of enchantment to your home. After giving them a thorough cleaning, these natural treasures are ready to be transformed into unique masterpieces. Here are some innovative ideas to help unleash your creativity and make the most of those beautiful pine cones:
- Pine Cone Wreath: Create a statement piece for your front door by arranging cleaned pine cones in a circular pattern. Layer them to add depth and dimension, then secure with craft wire. Spray with metallic paint for a touch of elegance, or intertwine a string of fairy lights to add a festive glow.
- Pine Cone Ornament: Adorn your Christmas tree or garland with charming pine cone ornaments. Attach a loop of twine or ribbon to the top of each cone using hot glue. Sprinkle with glitter, paint them in vibrant colors, or use metallic markers to create intricate designs. Hang them and let the tree sparkle with rustic beauty.
- Pine Cone Centerpiece: Set the table for a nature-inspired feast by crafting a stunning centerpiece using clean pine cones. Arrange them on a platter, surrounding a pillar candle or a small vase filled with seasonal flowers. Add a sprinkle of artificial snow or dried leaves for a touch of whimsy.
With just a little creativity and the simplicity of pine cones, you can craft captivating decorations that will bring the natural beauty of the outdoors into your living space. Let your imagination run wild and make your home a haven of warmth and charm!
Q&A
Q: Are you tired of seeing dull and dirty pine cones? Are you looking for creative ways to incorporate them into your crafting projects? Wonder no more – we’ve got the ultimate guide on ! Get ready to unleash your creativity with these sparkling natural gems!
Q: Why should I clean pine cones before using them for crafting?
A: Cleaning pine cones is essential to ensure that they are free from dirt, debris, insects, and any other unwanted surprises. By cleaning them, you’ll not only make them visually appealing but also ensure they are safe for use in your crafting projects.
Q: What’s the best method to clean pine cones?
A: There are various methods to clean pine cones, but one of the most effective and natural ways is to bake them in the oven. Preheat your oven to 200°F (93°C), spread the pine cones evenly on a baking sheet, and let them bake for about an hour. This process will kill any insects and dry out any sap or resin.
Q: How can I add an aromatic touch to my pine cones?
A: If you want to infuse your pine cones with a pleasant scent, consider adding essential oils. After cleaning the pine cones, place them in a plastic bag or container and add a few drops of your favorite essential oil. Seal the bag or container and let them sit for a few days, allowing the scent to permeate the cones.
Q: Can I clean pine cones without using an oven?
A: Absolutely! Another popular method is to soak them in a solution made from equal parts water and white vinegar for about 30 minutes. This will remove dirt and help to eliminate any lingering odors. After soaking, rinse the pine cones thoroughly with water and air dry them.
Q: How do I embellish pine cones for crafting projects?
A: Once your pine cones are clean and dry, the creative possibilities are endless! You can spray paint them with metallic or vibrant colors, dip them in glitter for a touch of sparkle, or even brush on some acrylic paint for a more artistic look. Use your imagination and let your crafting skills blossom!
Q: Are there any safety measures I should keep in mind?
A: Safety always comes first! When handling pine cones, it’s advisable to wear gloves to protect your hands from any potential allergens or prickly edges. Additionally, ensure proper ventilation when using paint or other chemical-based products, especially indoors.
Q: Can I preserve my pine cones after cleaning them?
A: Absolutely! If you want your pine cones to last longer, you can apply a clear spray varnish or sealant to help retain their natural beauty. This step will also provide added protection against insects and help to maintain their shape and color.
Now that you’re armed with the knowledge of , let your artistic side shine! These beautifully cleaned and embellished pine cones will undoubtedly add a touch of nature’s charm to your crafting endeavors. Happy crafting!
Wrapping Up
As we bid farewell to this informative journey on , we hope our advice has ignited a spark of creativity, transforming those once ordinary pine cones into sensational works of art. Whether it’s a whimsical wreath, an enchanting centerpiece, or a nature-inspired masterpiece, the possibilities are as vast as your imagination.
Remember, the process may seem daunting at first, but fear not! With a little patience and a sprinkle of dedication, you can achieve pine cone perfection. Embrace the therapeutic joy of tidying away debris, unveiling the true beauty within each delicate scale, and watch as a dormant botanical treasure awakens before your eyes.
Now armed with the knowledge to scrub away the dirt and grime, you can harness the essence of the forest, bringing nature’s untamed spirit into your crafting sanctuary. Allow these humble pine cones to transcend their humble origins, becoming conduits of inspiration and vessels of creativity that enhance any artistic endeavor.
As you embark on your crafty endeavors, don’t forget to explore various finishing techniques, such as painting, glittering, or even scenting your newfound woodland gems. The world is your canvas, and these rustic wonders are your artistic weapons.
So, dear crafters, may your creative spirits continue to flourish, fueled by the timeless allure of nature’s bounty. As you gather your supplies, treasure every step of this transformative process, for within its simplicity lies an opportunity to connect with the natural world, soothing your soul one pine cone at a time.
In the end, take pride in your accomplishment, knowing that your craftsmanship is a testament to both your skill and the beauty found in the simplest of things. With each meticulously cleaned and crafted pine cone, you’ve crafted not only a physical masterpiece but a memory etched in the fibers of time—an ode to tactile creativity in an ever-evolving world.
So go forth, dear readers, and let your imaginations run wild. May these humble pine cones serve as the conduit between your dreams and reality, reminding us that possibilities are endless, even within the smallest of natural wonders. Happy crafting!