Do it yourself nail polish kits are a great way to have fun and express your creative side. With these kits, you can easily create your own custom nail polish colors and designs. You’ll find all the tools and materials you need in one convenient package, so you won’t have to worry about shopping for additional supplies. And best of all, you can create beautiful nail art without spending a fortune! So if you’re ready to get creative with your nails, why not give a do it yourself nail polish kit a try?If you are looking to create your own custom nail polish colors, you will need the following items: nail polish base, pigments in your desired colors, mixing containers, stirring utensils, gloves, and a funnel. Additionally, you may want to have a small container of rubbing alcohol on hand to thin out the polish if needed. With these supplies, you can mix and match different colors to create unique shades of your own!
Step 1: Gather the Necessary Supplies
The first step in creating your own DIY nail polish is gathering the necessary supplies. You will need nail polish base, pigment or glitter, mixing cups, and a stirring tool. Additionally, you may want to pick up some thinning/thickening agents to help create the desired consistency of your polish. Once you have all the supplies together, you can get started!
Step 2: Measure and Mix
Once you have all your supplies gathered together, it’s time to start measuring and mixing. Begin by pouring your nail polish base into a clean mixing cup. Then, mix in your chosen pigment or glitter until you achieve the desired color and sparkle. If you want to adjust the consistency of your polish, add a thinning or thickening agent as needed until it reaches the desired texture.
Step 3: Test Your Color
After you have mixed your ingredients together, it’s time to test out your color! Pour a small amount of polish onto a spare piece of paper and let it dry for a few minutes before deciding if it’s right for your look. If not, adjust the ingredients as needed until it’s just right.
Step 4: Bottle Your Polish
Once you are happy with how your polish looks on paper, it’s time to bottle it up! Pour the mixture into an empty bottle with an applicator brush attached and secure the lid tightly. Make sure that any air bubbles are removed from the bottle before closing it up so that your nail polish will stay fresh for longer.
Step 5: Enjoy Your Creation!
Now that you have created your own DIY nail polish, show off your handiwork with pride! Whether you use it yourself or gift it to someone special, this is sure to be one of those projects that will always bring back fond memories. Enjoy!
Pros of DIY Nail Polish Kits
DIY nail polish kits are a great way to achieve a professional looking manicure, without having to spend money at the salon. The kits come with everything you need, from nail polish colors and tools, to instructions and even some fun extras. Some of the advantages of using a DIY nail polish kit include: Cost savings – DIY kits are usually much cheaper than going to the salon; Variety – You can choose from a wide range of colors and designs; Customization – You can mix and match colors for a unique look; Fun – It’s fun to experiment with different colors and techniques.
Cons of DIY Nail Polish Kits
The disadvantages of using a DIY nail polish kit include: Time consuming – It takes time and practice to create professional looking nails; Messy – It’s easy to make a mess when painting your nails; Limited options – You won’t be able to get the same choices as you would at the salon; Not all products are the same quality – Some products may not work as well as others. Additionally, if you don’t follow the instructions, it’s easy to make mistakes that could ruin your manicure.
Overall, DIY nail polish kits offer an affordable way to get professional looking nails at home. However, if you don’t have the patience or skill required for proper application, it’s best to go with a professional instead. With some practice, you can create beautiful manicures on your own with the help of these kits.
Choosing the Best DIY Nail Polish Kit
Finding the best DIY nail polish kit to suit your needs can be a tricky task. There are so many options available that it can be difficult to know what to look for. The first step is to determine what type of nail polish you need. Do you want a long lasting finish, or something more natural? Are you looking for something with special effects, or just a basic kit? Once you have an idea of what you’re looking for, it’s time to start shopping around.
When it comes to choosing the best DIY nail polish kit for your needs, there are a few things to consider. First and foremost, look for quality products that are free from harsh chemicals and toxins. Natural ingredients like shea butter and natural oils are great for nourishing nails, while avoiding potentially harmful ingredients like formaldehyde and parabens. You should also look at the colors available in each kit and make sure they match your own style.
Another important factor when choosing a DIY nail polish kit is the type of brush included in the set. A good brush should be easy to handle and distribute polish evenly without dripping or leaving streaks on your nails. Check out reviews online to see what other people think about certain brands before making your final decision.
Finally, it’s important to pay attention to any instructions included with the product before beginning your manicure. Doing so will help ensure that you get the best possible results from your manicure and avoid any potential mistakes or accidents along the way. With these tips in mind, you’ll be able to find the perfect DIY nail polish kit for all of your manicure needs!
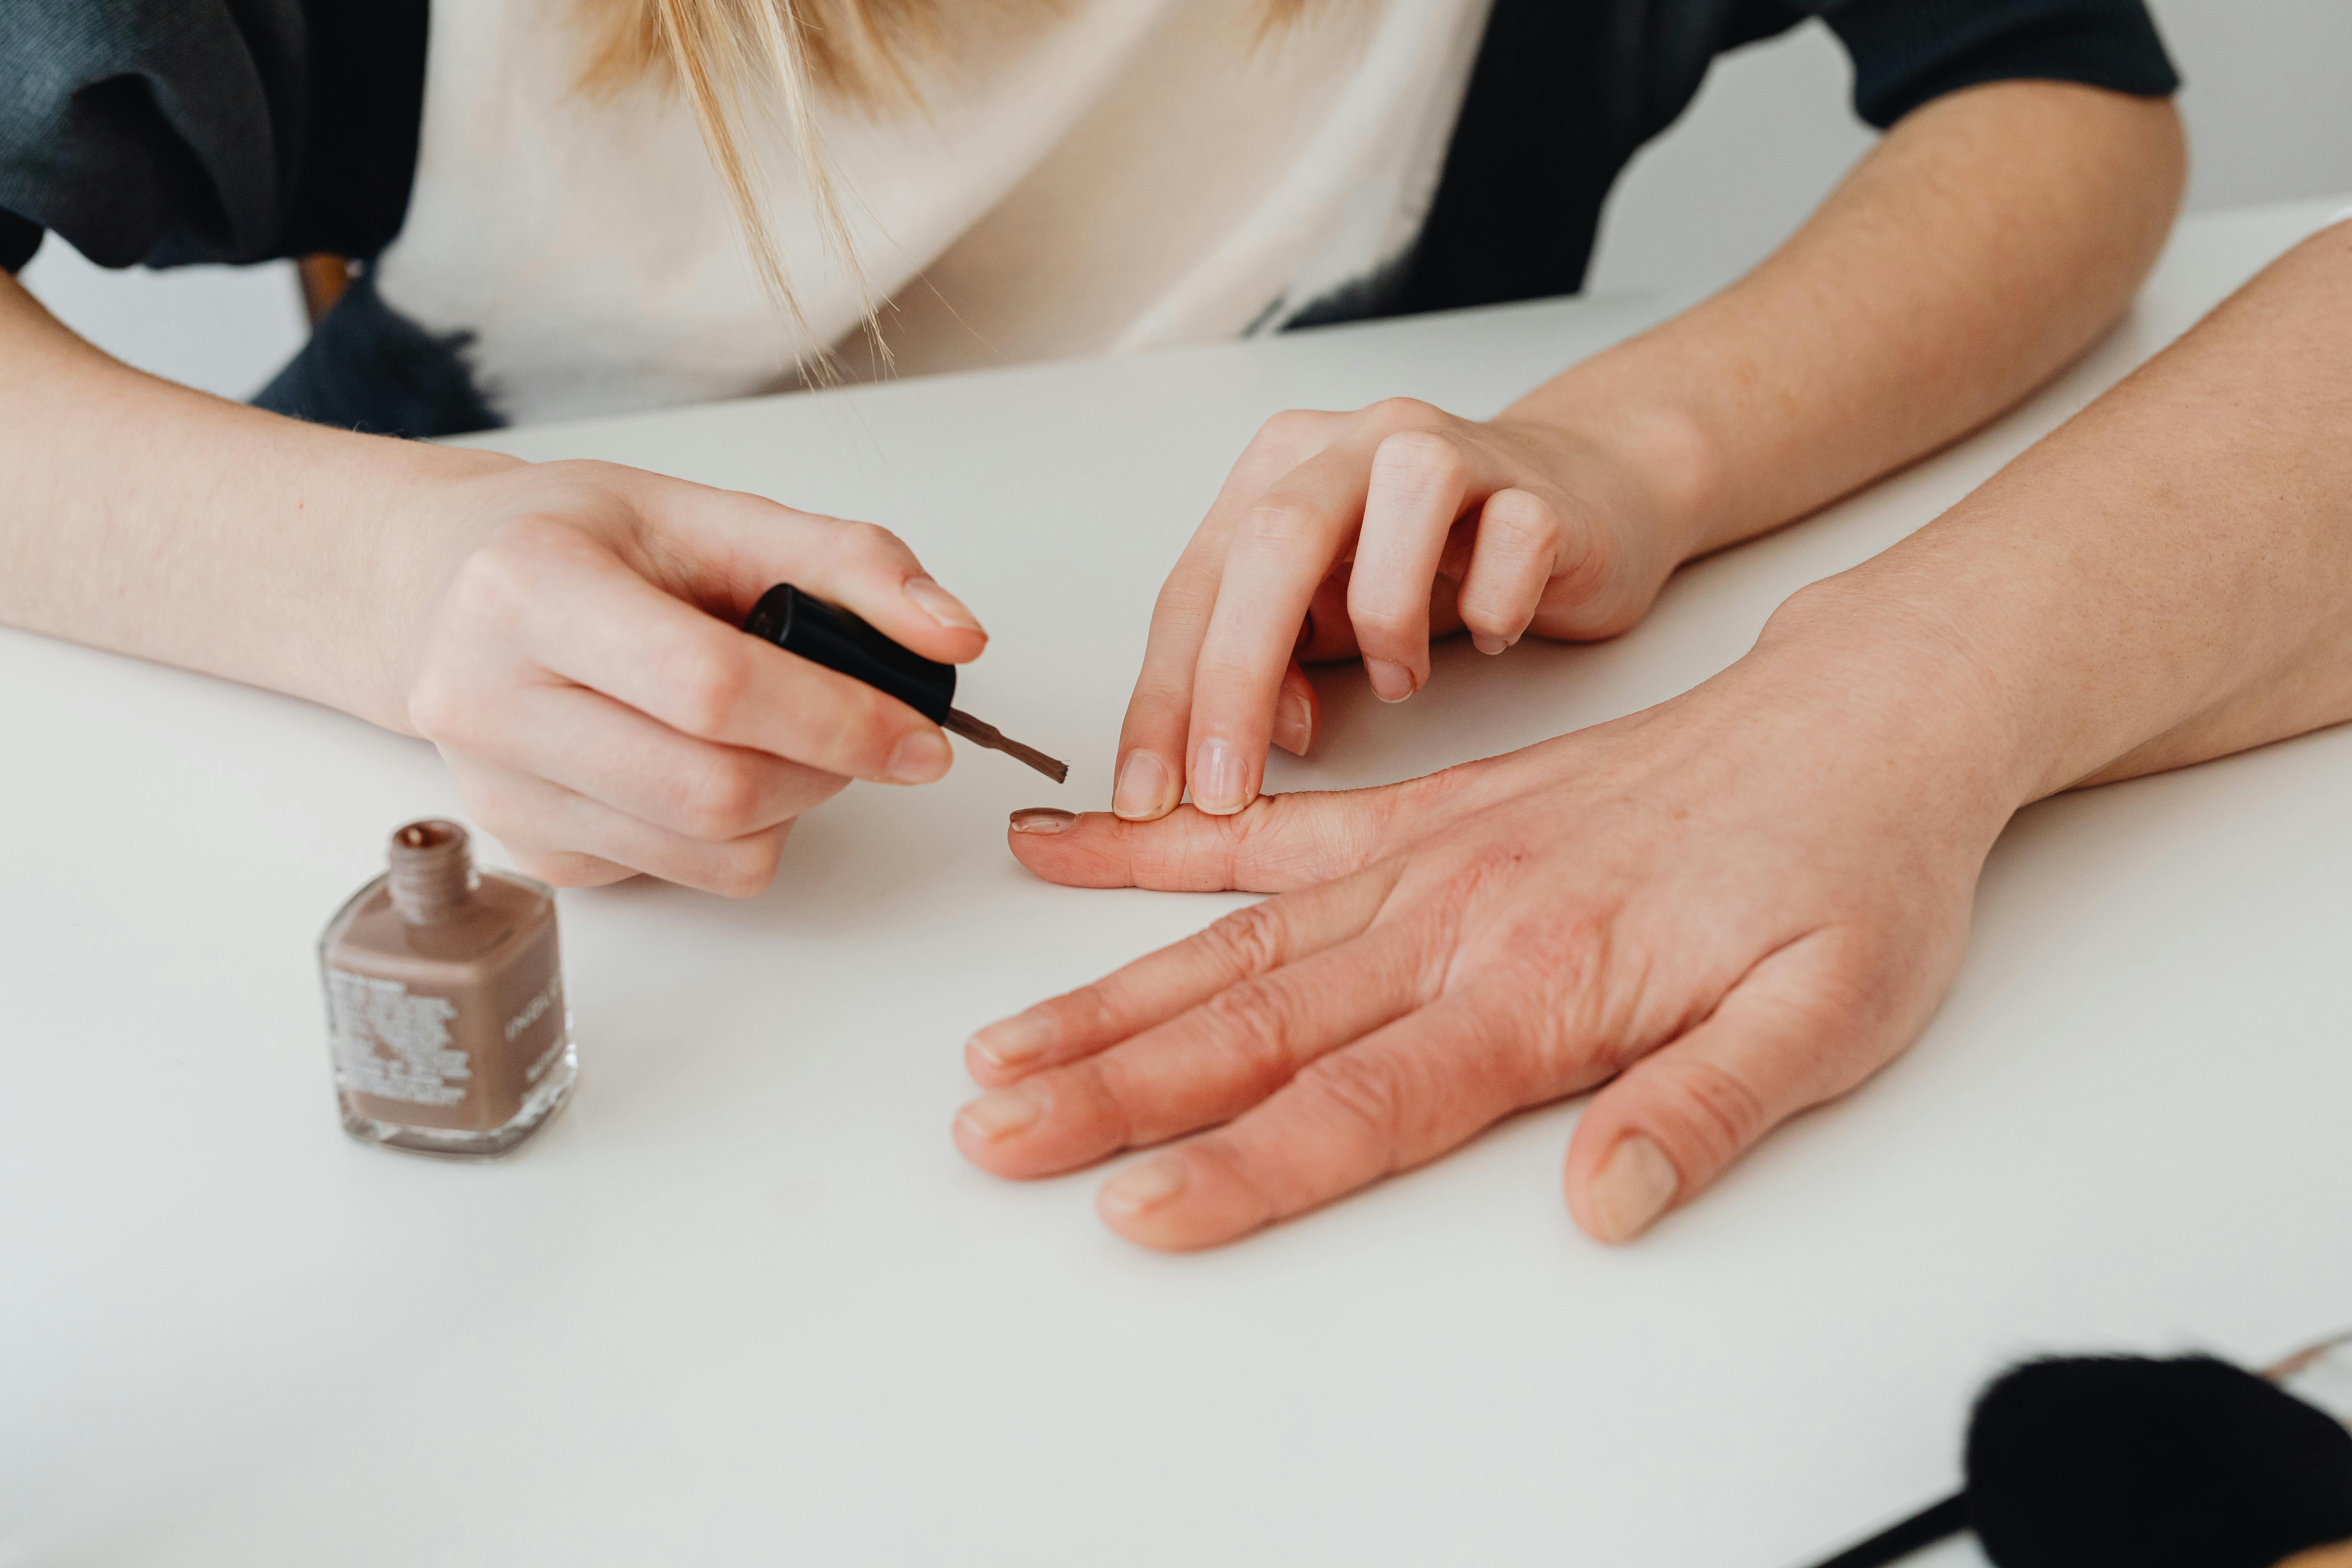
Prepare Your Nails
Before you start painting your nails with a DIY nail polish kit, it is important to prepare your nails. Start by filing and shaping your nails to the desired shape. Use a nail buffer to smooth out any ridges and make sure the surface of your nails is clean and free from any dirt or oils that could interfere with the polish.
Choose Your Colors
Once you have prepped your nails, it’s time to choose the colors for your manicure. With a DIY nail polish kit, you can mix and match different colors to create unique designs and looks. Experiment with different color combinations to find one that suits you best.
Apply a Base Coat
It is important to always apply a base coat before applying colored nail polish. This will help protect your nails from staining, as well as provide a smooth surface for the colored polish to adhere to. Wait for the base coat to dry completely before moving on to the next step.
Apply Your Color
Once your base coat has dried, you can begin applying your colored nail polish. Start with one hand at a time and make sure each layer is completely dry before moving on to the next one. If you are creating a design or pattern, use tape or stencils as guides for creating clean lines between colors.
Finish with Top Coat
When all of your colored polishes have been applied and are completely dry, it’s time for the top coat. This will help seal in your design and add extra shine and protection against chipping and wear-and-tear. Make sure each layer of top coat is completely dry before applying another one.
Removal Tips
Using Too Many Coats
When using a DIY nail polish kit, it’s important to not apply too many coats of polish. Applying too many coats can lead to an uneven finish and can make the nails look clumpy. Instead, try to use two to three thin coats of polish and allow them to dry in between each coat. This will ensure that your nails look even and have a smooth finish.
Not Preparing the Nails
Before applying the nail polish, it is essential to prepare the nails properly. This includes cleaning the nails with nail polish remover and filing them into the desired shape. Failing to do this can result in a sloppy looking manicure that won’t last as long as it should.
Not Waiting Long Enough Between Coats
When using a DIY nail polish kit, it is important to wait long enough between coats for them to dry properly. If you don’t wait long enough, the wet polish can smudge or chip off easily and ruin your manicure. To prevent this from happening, make sure you wait for at least two minutes between each coat before adding another one.
Using an Old Polish
Using an old or expired nail polish can result in a poor finish and may cause damage to your nails over time. To ensure that your manicure looks its best, use a fresh bottle of nail polish every time you do your own nails at home.
Not Sealing with a Top Coat
Finally, when using a DIY nail polish kit, it is important not to forget about sealing with a top coat after you are done applying the colored polishes. A top coat will help protect your manicure from chips and scratches while also giving it an extra glossy finish.
Clean the Tools
It is important to keep your DIY nail polish kit clean. Start by cleaning off any excess nail polish and debris from the tools. Use a cotton pad soaked in warm water and a mild detergent to wipe down the tools. Dry the tools thoroughly with a soft cloth before storing them away. Once they are clean and dry, store them in an airtight container to keep them free from dust and other particles.
Organize Your Supplies
Organizing your supplies is key to a successful DIY nail polish kit. Separate your polishes into different categories, such as light colors, dark colors, glitter, etc., for easy access when creating your own custom shades. You can also organize your supplies by color or brand for convenience. Additionally, you can use small plastic bags or containers to store all of your supplies in one place.
Store Your Kit Safely
When it comes time to store your DIY nail polish kit, make sure you choose an area that is cool and dry. Avoid storing it in direct sunlight or near any heat source as this can cause the polishes to thicken or change color over time. Keep the lid on tightly when not in use to prevent spills and contamination of other products.
Clean Up After Yourself
After you’re done with your DIY nail polish project, make sure you clean up after yourself properly. Remove excess nail polish with a cotton swab dipped in acetone-free nail polish remover, then wipe down any surfaces that have been exposed to the product with a damp cloth. Lastly, carefully put away all of your supplies so they’re ready for next time!
Different Types of DIY Nail Polish Kits Available
DIY nail polish kits offer a fun and creative way to customize your nails. With so many options available, it can be hard to decide which one is right for you. Here are some of the different types of DIY nail polish kits available:
Nail Art Kits
Nail art kits are perfect for those who want to create intricate designs on their nails. These kits often come with stencils, stickers, and other tools that make it easy to create unique designs. With these kits, you can mix and match colors to create a look that is truly unique.
Glitter Kits
If you’re looking for a simple way to add some sparkle to your nails, glitter kits are the perfect option. These kits come with several different colors of glitter as well as a top coat that helps seal in the sparkle. Glitter kits are especially popular for special occasions like weddings or parties.
One-Step Gel Nail Kits
One-step gel nail kits provide all the tools you need for a salon-quality manicure at home. These kits include everything from base coat to top coat and usually come with a variety of colors and finishes so you can customize your look. The best part about gel nail kits is that they last longer than traditional manicures, so you don’t have to worry about chipping or fading as quickly.
Gel Nail Starter Sets
Gel nail starter sets are perfect for those who want to try out gel manicures without committing to an entire kit. These sets usually include just enough supplies for a few applications, so it’s easy to experiment with different looks without having to buy a full kit right away. Gel nail starter sets also make great gifts for friends or family members who love doing their own nails at home.
No matter what type of DIY nail polish kit you choose, these products make it easier than ever to give yourself salon-quality manicures at home. With so many options available, there’s something perfect for everyone!
Conclusion
DIY nail polish kits are a great way to create and customize your own unique nail polish designs. Not only do they provide you with all the materials and tools you need, but they also give you access to creative tutorials, tips, and ideas for creating unique looks. With these kits, you can unleash your creativity and create a look that is completely unique to you. You can also save money by creating your own nail polish designs instead of buying pre-made products.
Overall, DIY nail polish kits are a great way to customize your nails and express yourself creatively. If you’re looking for a fun and easy way to make your nails look amazing without spending too much money, then DIY nail polish kits are the perfect choice for you.